Everyone should know how to fashion a stove out of nothing. In this tutorial, we will demonstrate how to get a stove-and-pot stand out of a food-can. For a pot 1L or under, find a can which less than 3″ (7.6 cm) wide, ideally 2 ½” (6.4 cm) wide, and 2″ (5 cm) tall or under. For pots over 1L, seek cans which are 3″ or wider.
Learning how to produce an alcohol stove can is a valuable skill as denatured alcohol, or high-proof alcohol is found everywhere in the world. Now, an alcohol stove takes 8 to 10 minutes to boil water, which is not as efficient as a canister or white-gas stove. However, the supply is much more reliable as not every town carry white-gas, canisters or other fuel sources such as kerosene.
Plus, if one ever lose his or her backpacking in middle of a fire-ban, it’s not a difficult task to get back on track.
For finding fuel to burn, an alcohol stove can burn: methyl hydrate found in hardware stores, home-improvement stores and paint-supply outlets; ethanol fuel for artificial fire-places; drinkable alcohol which is at least 151-proof (75% alcohol), but 190-proof (90%) such as Everclear available at liquor stores burn cleaner: anti-freeze (such as HEET) which can be found at gas-stations, automotive stores and big-box stores such as Wal-Mart or Canadian Superstore, rubbing alcohol (or isopropanol) found at the pharmacy can be burned if the content is 90% or higher. And there are other places sold under a variety of names, but the listed ones are the easiest to find.
For a fuel bottle, ensure it won’t get mistaken as a water-bottle or juice-container. Denatured alcohol is designed to be toxic by nature so that people won’t drink them. If one is repurposing a drinking vessel, be sure to label it in a way that no one can miss the danger signs. For this reason, bottles for rubbing alcohol and contact-lenses are best as people seldom drink from white plastic containers.
Tools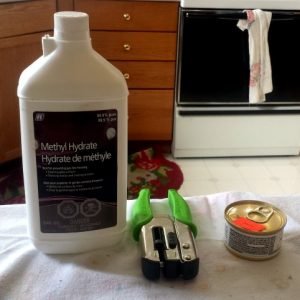
- Puncturing tool (e.g., awl, hole-puncher, drill)
- Pliers (optional)
- Felt marker (optional)
- Measuring tape (optional)
Supplies
- Cat food can, potted meat can or tuna fish can
The main thing to remember with steel and aluminum is steel, when fractured, will be sharp and must be filed down or have the edges coerced and folded safely. Aluminum can also be sharp, but generally, do not have to be amended.
Now, aluminum is preferred as they weigh three times less than steel and conduct heat better due to the thinness of the walls. Some people prefer steel, however, due to the more durable nature of the material.
 Many tools can be used from an awl to an electric drill. The only thing to remember is awl produces tiny holes which don’t boil water as quickly but might be the better option for someone who wants to simmer. With a drill-bit, wear eye-protection as shrapnel will fly.
For this project, we will use a hole-punch. Not all punch are created equal. For instance, some of the ones available at the dollar-store are only good for punching paper; but one of the same price-tag at an office-supply or craft-store will go through thin metal.
First, we procure a cat-can from the recycling bin, or just simply buy one and feed it to our pets. Then peel off the labels and wash thoroughly. Dish soap will remove the adhesive.
Before starting, flatten protruding sharp edges with a blunt object. Pliers would make life easier, but not necessary. We would not want to be accidentally slicing ourselves.


For those who want to simmer to cook their food, one row of holes is sufficient.
To start, we want to punch our first hole ¼” below the rim. Afterward, space the holes about somewhere between ⅛” (3 mm) and ½” (13 mm) apart until the first row is complete. For the second row, go adjacent to the hole in the first row and lower it by ⅛”. The distances between the centers of the two holes should be approximately ½” apart. Repeat the same step for punching holes for the second row.

One from a previous project. To boil water quickly as possible to rehydrate food, two rows is best.
Now, we seldom need the third row of holes for a cat-can stove. Some, however, who are using awls might have to do this. For a tuna-can, just the first row alone is sufficient.
By puncturing holes in the can, we are essentially turning it into a side-burner where the flame surrounds the pot in the flame. If we wish to burn alcohol inside the can without the vents, then the pot would have to be elevated on a stand to allow the flame to heat the pot more efficiently. So, by creating holes, we are eliminating the need for a stand.
Operating Instruction
Using an alcohol stove is simple: just pour in some alcohol and light it and wait 20 to 30 seconds to warm up then place the pot on top. Now, the flame will be invisible, unless it has additives such as the ones found in anti-freeze.
To light it, most people use a Bic; however, matches are easier to use and put one’s hand out of harm’s way.
To increase fuel-efficiency and blockade from the wind, add a windscreen. A windshield can easily be fashioned out of aluminum foil by cutting a sheet 3″ longer than the circumference of the plot, folding it in half and doubling over the edges by 6 mm.
 Now, for how it takes to cook will require some home-experimentation. As a general rule of thumb, it takes anywhere between 6 to 10 minutes to boil water. For many hikers who eat prepared meals packaged in zipped lunch bags, usually, by the time the fuel is exhausted, the meal is ready to eat. Those who wish to make meals from scratch should consider a canister or white-gas stove.
Now, an alcohol stove will reliably light until about 20°F or -7°C. Swedes and Finns, in the homeland of the Trangia stove and where alcohol stoves are the part of every Army mess-kit, report they can get these stoves lit in -25°C or -13°F by using tea lights or priming it by warming up the solution. To catch flame, the alcohol needs to be warm enough to evaporate.
The cat-can stove may not be as light as the soda-can stove, but it does not require a pot-stand and can be reliably made anywhere without too many tools.

CEO
Shahid Maqsood is an experienced writer and journalist with 10+ years in the industry. He is the CEO and founder of TheWisy, where he writes daily articles covering topics like books, business, news, sports, and more. Shahid holds an MBA from Virtual University of Pakistan and a Master's in Mass Communications. He is based in Faisalabad, Pakistan. His work spans multiple platforms like dosttrusty.com and newsbreak.com,Quellpress.com , airriflehunting, and bruitly.com showcasing his versatility and depth. Shahid's insightful articles reflect his expertise, authoritativeness, and trustworthiness, making him a respected and reliable voice in digital content creation. His contributions engage and inform readers, embodying professionalism and passion in every piece.